Friday, January 29, 2010

Homemade crackers


Last fall hubby and I splurged and went to a bed and breakfast in Stillwater, MN. It was called The Elephant Walk B&B, and it was very nice. The best thing about it was the plate of goodies inside your room when you arrived -- various yummy artisan cheeses, grapes, pistachios, apples, and delicious homemade crackers.

Those crackers were so good, I asked the innkeeper for the recipe, and she happily obliged. I grabbed a piece of paper out of my purse and scribbled down the directions as she talked. I thought I had it all down. As you'll see below, I was wrong.

Tonight I decided to make the crackers. We're having company this weekend, and I thought the crackers would be nice to serve for an afternoon snack. The recipe started off with 'make a stiff bread dough.' So I made a white bread dough, and let my six-year-old help with the kneading. He took great delight in pounding the dough as hard as he could with his little fists.


It was here that I realized I was missing a vital piece of information. Do I let the dough rise, or not? I thought about it for awhile, and figured that since I was told to use a bread dough, then I should follow through with bread dough basics, and let it rise. So, I did.

After that step, my recipe said, 'using a pasta machine, roll it thick first and then as thin as you can.' So I did, and spread the pieces over my kitchen table. I only rolled a third of the dough, as my table could only hold that many pieces at once.


Then my recipe said, 'Place on parchment paper, on a cookie sheet. Brush with egg whites and sprinkle sesame seeds over top. ' So I did.


Then, 'bake in a 425 oven for a few minutes until lightly browned.' So, I did.


Whoa! Wait! What's going on here? What are those big air bubbles doing in my crackers? There aren't supposed to be any air bubbles! The B&B crackers were lovely and flat and evenly browned. If I get air bubbles, the crackers will puff up and the tops of the bubbles will get burned before the flat parts get browned.


Which is exactly what happened. Rats. What do I do now? I can't 'unrise' the dough. Too late for that. I still had a bunch of dough left, and I didn't want to start over. The only thing I could think of was to beat and flatten and punch the dough to within an inch of its life. Then use a rolling pin and flatten it some more. Then send it through the pasta roller. So, that's what I did.


The resulting crackers were a lot better. I also reduced the heat to 350, which helped even out the browning. Only a few smaller air bubbles. Not as good as the B&B's, but good enough to serve to guests. Note to self: don't let the dough rise!

I went to the grocery store today looking for some artisan cheeses to serve with the crackers, but was sorely disappointed. There was about thirty different brands and varieties of cheddar, Colby, hard mozzarella and Monterrey Jack. In desperation I bought the only non-block cheese I could find -- some soft Swiss and Edam. Never had Edam before, so we'll see what that tastes like.

Maybe if I have time tomorrow I'll whip up a batch of fresh mozzarella before our company arrives around lunchtime. Right after I help hubby clean the house, bake a birthday cake, make deviled eggs, plan party games, take care of the livestock, and do a bunch of laundry.

Yeah, right!

Tuesday, January 26, 2010

Just six easy steps!


Okay, now that you are all jazzed and jived about using lard, let me show you how you can make it at home. At least, I'll show you how I make it in my home.

Step One: Find some pig fat. The easiest way to do this is head for a butcher shop. Unless your grocery store butchers its own animals, they're not likely to carry the stuff in the store. Not a lot of demand for it, you know.

Find a butcher shop, walk inside, and ask for pork fat. Between five and ten pounds. The butcher might look at you strange and say 'Do you mean lard?' If so, nod your head and smile. Some butchers don't differentiate between rendered and unrendered lard.

If you're having your own hog butchered, ask them to separate the fat that's next to the kidneys and loin from the rest of the body fat. Kidney and loin fat is the most pure, and has less of an odor. Lard rendered from this fat is called 'leaf lard.'

The picture above shows the meat we got from the hog we had butchered last fall. All of the fat is stored in the two bags on the top shelf.

Ask the butcher to grind it up for you. This makes it a whole lot easier to melt. If they can't grind it up, expect to spend about an hour cutting it into little chunks at home.


Step two: Put the fat into a big pot. Turn the burner onto medium high heat. Add a few inches of water and put on the lid. Once it starts to boil turn the heat down to medium.

Some folks don't add water. That's fine. If you don't add water, I suspect you have to melt the fat over a low heat to prevent scorching. I add water because I want to use a higher heat to melt it more quickly. I also think that using water yields a better quality lard. But that's just my own theory, untested and unproven.


Step Three: Melt the fat. Now, in the picture above you can see some submerged, unmelted masses of stuff. This 'stuff' is extra bits of tissue and meat that got mixed in when the butcher was grinding up the lard. Obviously, this stuff won't melt. That's okay. It will strain out later. Some folks keep this stuff and fry it up to make 'cracklings.' I've never done this before. Anyone have any experience with this?

Warning: At this point you will begin to smell the melting fat. To an unaccustomed nose, the smell may be unpleasant. But it doesn't bother me in the slightest. That's because I'm used to it. Personally I find the smell of margarine to be mildly nauseating, but that's probably because I haven't used it in nearly ten years. Yeah, I'm an odd duck.

The time required for melting depends on the heat level used to melt the fat. If you're using low heat, it can take the better part of a day. If your using medium heat, it could take just a few hours. It's hard to tell when all the fat is melted -- use your best guess. When the unmelted bits look more like cooked pork rather than unmelted fat, you're likely done.

Step Four: Strain the melted fat. To do this, line a large colander with several layers of damp cheesecloth. Put the colander over a large bowl. Ladle or pour off the melted fat into the colander. The non-melted bits will be caught in the colander, and the melted lard will pour through.


Step Five: Pour the melted fat into a container.

If you didn't add water during melting: Pour the lard into one or more storage containers. I recommend using several smaller containers, rather than one big one. Recycled pint-sized sour cream or yogurt containers work well for this. Put them in the fridge to cool.


If you added water during melting: Pour the lard into a large plastic bowl (like an ice cream pail), and put it into the fridge to cool overnight. The next day the lard will have separated from the water. The lard will be on top, with the water underneath. Take the ice cream pail and dump it all out into a clean sink. It may take some thumping to get the lard out of the pail. Try running a butter knife around the edge. When it's out, wash away the water and scrape off any aspic. Cut the lard into smaller pieces and put them into one or more storage containers.

Step Six: Store the lard. Keep one container in the fridge for immediate use, and put the rest in the freezer. Lard will last longer if it's kept frozen.

Note on Aspic: After the lard cools there may be a thin layer of aspic at the bottom of the container, beneath the lard. It's harmless -- just scrape it away.


The picture above shows about half of the lard I produced from the large pot of fat I started melting above. Which is about half of the fat I got from the hog. In other words, the dinner plate of lard above represents about 1/4 of the lard produced from one hog. Obviously, this will vary depending upon the size and breed of the animal.

Depending on the quality of fat you've used, the lard will vary between yellowish white to nearly white in color. Leaf lard will have very little scent, while regular lard will have a distinct (but not overwhelming) scent.

Use only leaf lard in pastry. When I first started using lard I made the mistake of using regular lard in a peach cobbler crust. There was definitely some added flavor there. Not horrible, but not great either. Regular lard is perfect for frying -- potatoes, eggs, meats, etc. But leaf lard is preferable in pastries.

I sound like an expert here, but I'm not. This is just the way I do it -- I'm sure there are dozens of different ways to render lard. Feel free to chip in with your own techniques or tricks. I'm always hoping to learn something new.

Saturday, January 23, 2010

Four-letter word


To most people, lard is a four-letter word. It was for me, up until about five years ago. Synonymous with gross, the word brings visions of greasy food and greasy hair into most people's minds. Why would anyone want to use the stuff? It's pig fat, for gosh sakes! Why would you want to cook with pig fat?

Well, because lard is good to cook with. Really good, in fact. I'm not talking 'spread it on your toast' good -- even I would shy a bit before doing that. But nothing can beat lard in a pie crust, and it's just the thing if you want really crispy hash browns.

Some folks are deterred by the fact that lard is, indeed, fat from a pig. I am amazed by this -- don't people realize that 1/3 of the fillings in hot dogs, brats and sausages are pig fats? Are folks unaware that bacon is streaked with pig fat? And what is it that makes a good pork roast so succulent and tender -- magic fairy water?

America is fat phobic, thanks in large part to our two world wars. Animal fats were in short supply during wartime, so agribusiness (such as it was in those years) began huge advertising campaigns to convince folks to buy margarine and shortening, instead of butter and lard. They told folks that these new wonder foods were far more healthy than their old-fashioned counterparts. Lots of talk about saturated fats and high cholesterol, and lots of studies linking those things to a wealth of medical problems.

But wait! Holy triglycerides, Batman! It seems we were being misled all along. It seems that margarine and vegetable shortening have gone through a procedure called hydrogenation. It seems this hydrogenation process creates somethings called trans fats. And, it seems that trans fats are a lot worse than saturated fat for your health.

But forget about the science. Truth to tell, trying to keep up with all the science is a little daunting to me. Especially since I'm not sure what to believe. Scientific studies can be manipulated to reach any outcome, depending on who's paying for the research. That's why I try to rely more on common sense. Three particular bits of common sense, in this case.

Common sense tells me that the closer a food is to its original form, the better it is. Lard passes this test -- no hydrogenation, no chemical additives, no artificial anything. Straight from the pig. Watch out for store-bought lard, though -- likely it's been hydrogenated to lengthen shelf-life.

Common sense also tells me that hundreds (or thousands) of years of people eating something is better research than a few decades of human experimentation. Lard has been around a long time, folks. People know just about all there is to know about it, and nobody is trying to keep that knowledge hidden. Which is more than we can say for most of the processed, industrialized food out there.

Common sense tells me that if I can pronounce a food and its ingredients, it's better for me. Anything longer than three syllables and a red flag goes up. Any hyphens between syllables and a siren starts going off. Again, lard passes this test with flying colors. You can't get any easier than 'lard.' One syllable, no hyphens.

After all, it is just a four-letter word.

Tuesday, January 19, 2010

Flocked


Another hoar frost. It looks like someone went around and doused the whole landscape with a can of Christmas tree flocking spray. The picture above is of a cattail marsh I drive past on my into the park.


A stand of aging ash trees. The sun never shone, so the frost never melted. The overcast sky turned everything a beautiful blue color late in the afternoon.


Another little cemetery about a mile north of our house. The man who built our house is buried here. I'll write more about that another time.


A crumbling stone barn foundation being overtaken by trees. My little 2.8 optical zoom, 5.0 megapixel digital camera can't capture the beauty of the land around me. That, and I need a few lessons in photography. Maybe I'll put a new camera on my birthday list. I can dream, can't I?

Sunday, January 17, 2010

Need seed?


Well, it looks like the vast majority of my tested seeds are going to pass muster. That means that I have no reason to throw them out based on germination results. So I must find other means of reducing my seed stockpile -- my little refrigerator is bursting at the seams. Every time I open the door several packets come tumbling out.

So, inspired by another blogging friend, I am happily offering packets of the following seed varieties to anyone who is interested. These are all open pollinated, organically grown seed, germination tested and kept in cold storage. Most of the parent seeds came from Seedsavers Exchange so you can check out their online catalog for more info. The round french summer squash came from Seeds of Change. And the Taliana tomato came from here.

Waltham Butternut Winter Squash


Table Queen Acorn Winter Squash


Round French Summer Squash


Small Gourd mix


Mandan Bride Flint Corn


Wisconsin 55 Tomato


Red Zebra Tomato


Beam's Yellow Pear Tomato


Aunt Ruby's German Green Tomato


Amish Paste Tomato


Taliana Tomato
(click here for more info)

I also have some yellow onion and American purple top rutabaga seeds, the parents of which came from a local nursery.

So, if anyone is interested in free seeds, let me know! Give me your email in your comment, and I'll make contact for an address. Help me out here, please! I need to make room for more seeds!


Saturday, January 16, 2010

The joy of cookbooks


I made noodles the other day. You can see my well used, well abused Joy of Cooking to the left. It's one of my favorites. The pages are stained and sticking together, and the binding is beginning to break. My husband occasionally asks me if I want a new copy. No way! Each batter splatter, each gravy glop is a sign of love. I have other cleaner, shinier cookbooks, but they're not nearly as good. The dirtier, more disheveled a cookbook looks, the better it is.

That's true for a lot of things, actually. And a lot of people. The shiny pretty ones aren't worth a plug nickel most of the time. It's the stained, ripped, broken ones that are worth keeping in the long run.

Friday, January 15, 2010

Day six


We had a hoar frost last night. This morning it rained ice crystals from the trees. While I was taking pictures of the frost I had my camera pointed upwards, and a shard of frost fell down and landed on the lens. I thought of little Ralphy from The Christmas Story and wanted to tell my husband that I shot my eye out.

Six days into germination testing, and we have some preliminary results. Of the 22 test varieties, eight are already at 100% germination. Ten more are above 70%, and three are hovering around 50%. Only one is below 50% -- my 2004 spaghetti squash, which is at 0. Unless it makes a miraculous comeback, that bag o' seed is headed for the trash.

My 2009 sugar pie pumpkin is at 50% right now. I just scooped these seeds from a pumpkin that's been in my basement up until last week. Do pumpkin seeds need stratification? I'll have to do some research.

My four-year-old sweet corn seed is still good. As is my four-year-old onion seed. I've never grown onions from seed before. I think I'll give it a try this year.

On a whim I tested some organic popcorn. Not actual popcorn seed, but the actual popping corn you buy for, well, popping. And, believe it or not, it grew. 100% germination, to be exact. I thought that was kinda interesting. I wonder what's cheaper -- a bag of popcorn from the store, or a bag of popcorn seed from a nursery? I'm betting on the former.

Tuesday, January 12, 2010

Cellar news


Now that the outside temps are colder, it's much easier to keep the root cellar temperature at the proper level. I aim for somewhere between 32 and 36, with high humidity. The humidity has also been easy -- we've got a naturally dank basement, and thanks to 14 inches of rain in October, the ground is still saturated. Our average annual rainfall is 21 inches. Our basement subpump is still running every other day or so, which is pretty much unheard of in January here.


I took a quick inventory of the goodies in my root cellar, and I must say I am verily pleased. 95% of the potatoes are still good. It seems the Kerr's Pink variety doesn't last as long as the others, so I'll know to eat those first next year. And the blight spots and green spots don't seem to affect storage longevity. Also, the thickness of the skin hasn't been a factor--the thin-skinned spuds are doing just as well as the thick-skinned ones.

My few rutabagas turned soft and mushy back in December. Next year I think I'll plant them later in the season and keep them in the garden as long as I can. The beets didn't last long, either. Not a big loss, as my family doesn't like beets. But still good to know.

My two remaining cabbages are looking pretty decent, as are the two winter squash I have in the cellar. I've read that squash prefer a warmer storage temp, somewhere around 50 degrees. I have most of my squash in the main basement area, but I thought I'd experiment and put a couple in the cellar. So far so good.


And I've still got about two bushels of apples left. They look fine as well. If they start to go bad I'll do some processing. Anybody know how long apples will last in a root cellar?


Another surprise -- in my scrounging I found a forgotten tray of sand and carrots. When I saw them I winced, expecting a soggy mass of carrot mush. But when I reach my hand in, I was amazed to find most of the carrots still firm. They still had their short spikes of green stem sticking up, but apparently they stopped growing when the cellar temps dropped down far enough. I am elated by this, as I was not looking forward to buying supermarket carrots so soon.

So, overall the root cellar has been a fantastic success. I haven't had to buy any carrots, cabbage, potatoes, apples or squash so far this winter, and it looks like my boxes of seed potatoes will stay good long enough to plant next spring.

'To plant next spring.' Doesn't that phrase sound lovely!

Sunday, January 10, 2010

Germination Testing


The garden seed catalogs have started to arrive, so I've decided it's time to take a good look at my present seed situation. I've got a dormitory refrigerator filled to bursting with saved and purchased seeds downstairs. Before I order any new varieties I should really clean out my inventory.

Part of that clean-out is throwing away bad seed. But how do you know if seed is bad or not? How do you know if that packet of Chiogga beets you bought four years ago is still good? You've got two choices. Wait until spring to plant them and hope for the best, or do germination testing.

Germination testing is very easy. And fun, at least to me. You can do germination testing with as few as ten seeds or as many as a hundred. The more seeds you use, the more accurate your test results will be. However, if you only have a hundred seeds to begin with, you probably want to use as few as possible. I generally use between twelve and twenty-five seeds.

There's probably a dozen different ways you can test for germination rates, but this is the way I do it.

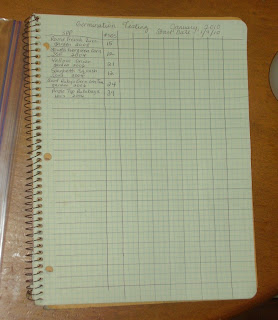
Gather together your seeds, a cookie sheet, a spray bottle with water, several half-sheets of paper towels, a ziploc bag, a ball point pen and some paper for recording.


Take a sheet of paper towel and write the name of the seed variety on the bottom with a ball point pen.


Now flip the paper towel so that the writing is face down, at the other end of the tray. This will make sense in a bit. Spray some water over the paper towel to dampen it. Take your seeds and spread them across the bottom of the towel. Try not to clump seeds together -- you want each seed to come in contact with the moist towel.


Now, beginning at the bottom, roll up the paper towel (and the seeds). Make sure the seeds stay inside.


When you're finished rolling, the name of the variety should be visible. Make sure the paper is fairly damp. Not oozing water damp, but pretty well saturated. Press the roll flat and slip it inside the ziploc bag.


Continue with this process for each of your seed varieties. Several varieties can go inside one bag. When you are finished, put the bag (open, not closed) in a warmish spot where it will remain undisturbed. The top of the refrigerator, or under a lamp.


Be sure to record the species, starting date, and number of seeds being tested.


The blank spaces on each row are for recording the number of sprouts when I check on them. I check on mine every three days or so. Be sure to remove the sprouted seeds at each checking, lest they die and get moldy. If the paper towels are drying out, spray on some more water. After two or three weeks have gone by, I tally up the number of sprouted seeds and do a bit of math to figure out the germination rate.

I've been doing this for a few years now and have had my share of surprises. One year I tested one-year-old Waltham butternut squash seed and four-year-old Waltham butternut squash seed. The one-year-old tested at 20% where the four-year-old tested at 80%. I've had three-year-old onion seed sprout at 95%, when all the gardening books I have say that onion seed goes bad after one year.

I'm testing a lot of seed this winter, twenty-two varieties to be exact. Like I said, I've amassed quite a collection of seed. I'll post my germination results as they come in. I'm sure you'll be on the edge of your seat!

Thursday, January 7, 2010

Snowbow


It's cold outside. Very snowy, very blowy. Yesterday the snow began around 10 am and the winds picked up shortly thereafter. The kids were let out of school at 12:30. School was closed today, and will be closed again tomorrow.

We've actually only received about six inches of new snow. It's the winds that are dangerous. The high today was -9, and while that in itself is pretty cold, it's not school-closing cold. But we had 25 mph winds bringing the windchill to -34. Those same winds can turn six inches of snow into eighteen inches of drift on the road.

Road plowing in rural areas is vastly different than plowing in the city. Generally, rural plows don't bother going out until the winds have stopped blowing. We have yet to see the plow drive by our house. If we were living in a city, the plows would have been by three times already. In the city, folks will ring up city hall if they can't make it out of their driveways by 8 am. In the country, we've all learned to keep a few days extra of everything on hand in case we're snowed in. I hope to see the plow sometime tomorrow afternoon, assuming the winds have died down a bit.

I did manage to take a picture of a rare winter beauty -- a snowbow. It's created by light refracting off snow crystals blowing across the ground. You can't get one from falling snow, only blowing snow, because the sun also has to be shining. The kids were excited to see it. 'A rainbow in January is pretty rare,' Owen said. Yes, indeed it is.


Tuesday, January 5, 2010

Living proof


It's true. If there is any disbelief in anyone's mind, cast it aside. Beyond a shadow of a doubt, large livestock confinement operations are ideal breeding grounds for disease. Turkey barns, egg factories, feed lots, old farmhouses in rural Minnesota. Wherever many animals of the same species are living together for long periods of time in a confined area.

We are the living proof. Last week my husband's family -- father, two brothers, two sisters-in-law, niece and two nephews -- stayed with us to celebrate the holidays. Thirteen people living under the same roof for four days straight.

We had a grand time, don't get me wrong. Highlights -- gift opening, rockin' Settlers of Catan games, my brothers-in-law getting the sagging barn doors to close, an evening raw milk run with my sister-in-law, baking and decorating about a bazillion sugar cookies, forcing people to watch Fresh the movie, my brother-in-law's Russian peasant woman costume and dance, and the building of massive snow forts in the backyard.


Lowlights -- On day three the littlest guy (far right in the couch below) getting sick at breakfast. His Mom & Dad thought it was because he was eating too fast, but now I'm not so sure. On day four the oldest girl and second littlest guy (far left and second from the right) got stomach sick. That evening, after everyone had left, our littlest guy (third from the right) got stomach sick. Yesterday morning I went down with a debilitating head cold, and yesterday afternoon our middlest boy (third from the left) got it too.


My brother-in-law phoned today and told us that now he has a head cold. So, out of the thirteen people who lived in our house last week, seven of them have gotten sick. The temps last week ranged from 7 above to 15 below zero. The kids spent some time playing outside, but not a lot. That meant a lot of people spending a lot of time in a small area. Ideal breeding grounds for all kinds of ick.

On one of the short stints outside, our eldest tried snowboarding on a sled down our septic mound. You take what slopes you can get out on the prairie.


Of course, the other large livestock companies attempt to mitigate their disease problems by continually feeding low dose antibiotics to their animals. Hmm. There's a thought. Maybe next Christmas I'll spike the hot cocoa with penicillin. Hey, if Cargill and Tyson can get away with it, why can't I?

Ah, you know me -- organic, chemical-free gal that I am. I'm just kidding.

Probably.