
While your cream is churning away, you can set up your straining area. I use a jelly bag, but cheesecloth folded three or four times will work too. Put the jelly bag into a strainer or collander, and then put the strainer on top of a bowl or pitcher. Also, if you intend on freezing your butter, set a large square of freezer paper out on your table. You can use freezer cartons or bags as well, but I think it's easier to work with freezer paper.

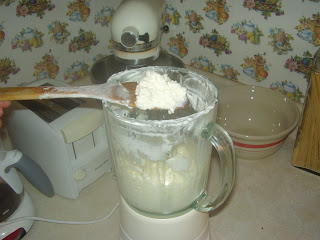
After your cream passes through the thickening and frothy stages, it will begin to 'break.' This means that the butter grains are breaking away from the buttermilk. My blender sounds like it's having an easier time mixing. If you turn off the blender early on in the breaking process and dip in a spoon, it will look like the photo above. The granules of butter are very small, and the buttermilk is still pretty creamy. But it is starting to separate.
(By the way, I am sporting a NASCAR bandaid in the photo above. I gouged myself with shears while trimming the goats' hooves yesterday. Ouch.)

After it starts to break, keep mixing for another minute or two. When you turn off the blender and look inside, the butter granules will be floating on top. Some people say they look like grains of rice. I think they look more like small cooked couscous. In either case, at this point it's pretty obvious that you have butter, and not the pudding that you had earlier.
Pour the contents of the blender through the jelly bag and strainer. The butter will be caught in the bag and the buttermilk will go through into the pitcher. If you have no intention of using the buttermilk, feed it to your animals or put it on your flower bed. It's got lots of good vitamins and minerals in it. I use buttermilk in baking, and making waffles and pancakes.
The next step is rinsing. Lift up the jelly bag/cheese cloth and bring it over to the sink. Be careful not to squish the butter inside. If you squish the butter, it will make rinsing harder. Hold the bag/cloth open under cold running water. Rinse all around the granules of water, trying to get as much buttermilk washed away as you can. You can gently move the butter around to break up clumps. I don't have a picture of the rinsing process, since it's kinda hard to rinse with two hands and take photos with a third.

When the buttermilk is rinsed away, the rinse water will run clear. Then it's time to squeeze the rest of the water out of the butter. The drier the butter, the longer it will keep in your fridge. With a jelly bag, the squeezing is easy - just close the top of the bag in your fist and twist it. Keep twisting until all of the water is gone and soft butter starts to ooze out of the cloth mesh.


Pat the bottom of the cloth dry with a towel. Then open up the cloth and turn the butter blob out onto your freezer paper. Now, this is normally the time when people like to add salt. I have tried, and found it quite difficult to add salt and mix it in equally throughout the butter. If I had a more professional butter-making setup, maybe it would be easier. But since I'm using my butter for cooking, I don't bother adding salt at all. There's nothing wrong with using unsalted butter on bread, it just will taste more bland than salted butter. Try it and see.
When all is done, wrap up the butter in wax paper for the fridge, or in freezer paper in the freezer. Clean up all the spilled cream from the counter, table and floor. Put the dishes in the sink and sit back and relax. Feel good about yourself - you've tried something new, and learned a new skill. Even if you encountered some trouble along the way, everything is a learning journey, and it'll probably work better next time. The first time I did it, I had some problems too.

With the four gallons of milk I started with, I ended up with two quarts of cream and 14 ounces of butter. That's not a whole lot, but then again I was using Holstein milk, which is pretty low in butterfat. If I had been using Jersey or Guernsey or Brown Swiss milk, I would easily have gotten twice as much butter. But then I would have had less skimmed milk for drinking.
I was the happy recipient of a electric butter churn this past Christmas (thanks Mom and Dad!). Next time I make butter, I will try it out and let you know how it goes. You're on the edge of your seats in expectation - I can tell!

6 comments:
Hey Jo! Just found the link to your blog from something Nate said on Facebook. Just wanted to comment on what you guys are doing. That is completely awesome. My wife Jess and I also live on a old farmstead (only 4 acres though) and raise chickens and have an orchard and garden. Looks like I may have to hit you up first when I have questions as you guys are pretty far along with all this. Well take care.
Rick
Rick! Wow! It is fantastic to hear from you! Last I heard (albeit about 15 years ago) you were in California. I will post on your blog, after reading about all the details of your life. Talk to you soon!
You are the true "earth mother". I can't figure out how you have time to do all of this with three little boys "helping"???
The boys don't help with the butter because the sound of the blender drives them away.
Hmm... Must remember that when the three of them decide to have relay races around the kitchen table while I'm cooking dinner.
Very good article. Thank you for taking the time to do it. My husband and I are moving from the city life to a home on 5 acres. We are researching how to become less dependent on the grocery store and other things. Your article gives me hope that some day I to can make butter. I think I will attempt goat butter one day.
Thank you again!!
PHD - You're very welcome. From what I've heard goat milk is naturally homogonized (that means the cream doesn't rise), so goat butter may be more difficult. But give it a go, and share the results!
Post a Comment